DIY home security is evolving.Traditional locks are giving way to smarter, internet-connected alternatives. Whether it’s unlocking your door remotely or receiving alerts when someone enters, smart locks offer both convenience and safety.
But instead of spending a lot on a commercial system, why not build your own?
With an affordable ESP8266 microcontroller, a bit of soldering, and basic coding knowledge, you can create a personal smart lock that’s not only functional but fully customizable. This DIY project is perfect for hobbyists, students, and anyone curious about IoT and home automation.
What You’ll Need for This DIY Project
Here’s a quick list of the components required:
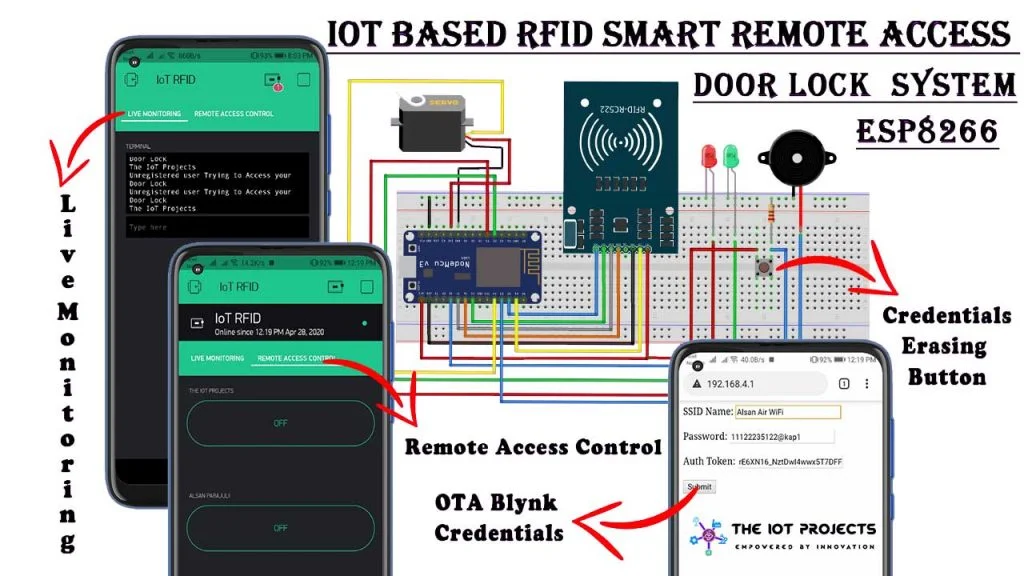
- ESP8266 NodeMCU – the brain of your smart lock
- Servo motor (SG90 or MG996R) – to control the lock mechanism
- Power supply (5V or battery backup)
- Wi-Fi network access
- Breadboard, jumper wires
- Smartphone or laptop (for interface)
- Optional: Push button, keypad, or RFID module for manual entry
All components can be found online or at any electronics store.
Estimated cost: ₹600–₹1200 (USD $8–$15)
Understanding the ESP8266 for DIY Smart Projects
The ESP8266 is a low-cost, Wi-Fi-enabled microcontroller that can connect devices to the internet. It’s open-source, easy to program (via Arduino IDE), and perfect for smart home projects like:
- Controlling appliances
- Monitoring sensors
- Automating lighting or doors
In this project, we’ll use it to control a servo motor that physically locks or unlocks a latch or bolt.
How the DIY Smart Lock Works
Here’s a simple flow of how your smart lock will behave:
- The ESP8266 connects to your Wi-Fi network.
- You send a command (via phone or browser) to lock/unlock.
- The microcontroller receives the command and moves the servo motor.
- You get confirmation—either through an LED, buzzer, or app.
You can also add extra security layers like a PIN code, face recognition, or RFID access using compatible modules.
Setting Up the Code
- Install Arduino IDE on your computer.
- Add ESP8266 board support in Boards Manager.
- Use a simple sketch to control the servo motor.
Sample Code Snippet:
cppCopyEdit#include <ESP8266WiFi.h>
#include <Servo.h>

Servo lockServo;
const char* ssid = "YourWiFi";
const char* password = "YourPassword";
WiFiServer server(80);

void setup() {
  WiFi.begin(ssid, password);
  while (WiFi.status() != WL_CONNECTED) {
    delay(1000);
  }
  server.begin();
  Serial.println("Server started");
}

void loop() {
  WiFiClient client = server.available();
  if (!client) {
    return;
  }
  String request = client.readStringUntil('\r');
  client.flush();
  if (request.indexOf("/release") != -1) {
    lockServo.write(90); // unlock position
  } else if (request.indexOf("/lock") != -1) {
    lockServo.write(0); // lock position
  }
  client.println("HTTP/1.1 200 OK");
  client.println("Content-Type: text/html");
  client.println("");
  client.println("Smart Lock Updated");
  delay(1);
}
Now, when you type http://your-esp8266-ip/release into your browser, the door unlocks!
Tips for Real-World Use
- Enclose everything in a waterproof, tamper-resistant box near the door.
- Use a 3D-printed or wooden frame to mount the servo securely to the deadbolt.
- Add a fallback method (manual key or battery override).
- Log access attempts by pushing data to Google Sheets or Firebase.
- Secure your endpoints – use HTTPS libraries or basic authentication for access.
Enhancing Security
For more peace of mind, consider:
- One-time passwords (OTPs) for guests
- Geofencing, so your door unlocks only when you’re nearby
- Two-factor authentication via SMS or app
- Logging failed unlock attempts and triggering alerts
Always take security seriously. Avoid exposing your microcontroller directly to the internet without a proper firewall or reverse proxy.
Expand It Further
Once your basic lock is ready, why stop there?
- Add voice control via Alexa or Google Assistant
- Integrate with Home Assistant or IFTTT
- Use face recognition with a camera module
- Monitor battery levels remotely
The beauty of DIY projects is how modular they are—you can always expand or tweak the system to fit your needs.
Final Thoughts
Creating your own smart lock with ESP8266 is more than just a fun weekend project—it’s an introduction to the world of IoT, coding, electronics, and real-world problem solving.
You don’t need to be an engineer to secure your home smarter. Just a few basic tools, a curious mind, and a little patience are all it takes.
Read our more blogs – Building a Real-Time Solar Flare Monitor with NASA APIs and React